2 Plans and Assessments
2.1 Field Safety Plans
Field safety plans are a critical component of our work. They are a way to ensure that we are prepared for the unexpected and that we have a plan in place to keep our team safe. The field safety plan should be specific to each project and should be kept easily accessible to all team members. An example can be found here. Information included in these plans include:
Location and contact info of accommodations where employees are staying so that the designated safety person can reach them in case of an emergency or required check-in.
Description of personal and company vehicles including make, model, year, and licence plate number.
Crew member contact details, including emergency contacts.
Personal and crew equipment checklist. A list of all required safety equipment can be found here.
Personal safety equipment is important especially because we are often working alone. Ensuring you have charged communication devices as well as spare batteries or chargers is critical for maintaining communication with the team. Personal safety equipment can be found in Table 2.1.
It’s also important to have the right safety equipment in the truck in case of vehicle issues, road conditions, or accidents. Truck safety equipment can be found in Table 2.2.
Location and contact info of nearest hospital.
Check in and failed check in procedures.
A brief description of the job, as well as map links and a list of possible locations where crew members will visit.
equipment |>
  dplyr::filter(!is.na(eq_pers_standard)) |>
  dplyr::select(`Personal Safety Equipement` = eq_item,
                `Purpose` = notes) |>
fpr::fpr_kable(caption_text = "Personal Safety Equipment")| Personal Safety Equipement | Purpose |
|---|---|
| clinometer | Tied to vest and used for gradients. |
| field vest (surveyors) | – |
| note book | Fits in surveyors vest. |
| GPS | Tracking by time at 10s always |
| Suncreen | – |
| Bugspray | – |
| Polarized glasses | Great for seeing the water. Can be necessary for the odd time electrofishing (depends on sun angle). |
| Bear Spray | – |
| phone/camera | – |
| battery pack booster for phone | – |
| Hat | – |
| first aid kit personal | – |
| Waders | – |
| Wading Boots (Rubber-soled only) | – |
| Extra clothes | – |
| rain gear | Light weight jacket used commonly even for dew in mornings. Pretty rare you would want pants due to waders |
| Ski poles | – |
| water | – |
| food | – |
| gloves work | To save the hands. I wear light weight little work home hardware or can tire cottton/polyester gloves most the time (I buy lots when they have the cheap florescent yellow jobies . Some people don’t like to wear them but I do. When it gets colder the gas station themal cotton/poly work gloves are good. |
| headlamp | Nice to have in your personal kit/vest for when it gets late. |
| hand lens | – |
| range finder | Great for long culverts and wide streams. |
equipment |>
  dplyr::filter(!is.na(eq_truck)) |>
  dplyr::select(`Truck Safety Equipement` = eq_item,
                `Purpose` = notes) |>
fpr::fpr_kable(caption_text = "Truck Safety Equipment")| Truck Safety Equipement | Purpose |
|---|---|
| Extra clothes | – |
| water | – |
| food | – |
| Hand saw | For bucking up tree if it falls in front on forest road |
| pilon x 2 | – |
| radio truck | – |
| Satelite communicator | – |
| first aid kit level 1 | – |
| polaski | – |
| shovel | – |
| fire extinguisher backpack | – |
| truck tow rope | – |
| truck/car jack | Standard in vehicles but need to confirm you have and can access (and can access spare) |
| Battery booster | Needs to be charged. Can save a major rescue mission. |
| Compressor 12V | – |
| Tow strap | – |
| cloth or paper towel | For wipping away condensation and cleaning the windsheild |
2.1.1 Check-in Procedures and Field Communications
Call, text or InReach emergency contact each morning to share the plan for the day (i.e. name of roads and sites). Agree on a regular daily check in time and report position/provide updates.
2.1.2 Procedures for Failed Check-In
If a phone call or InReach check-in is not received by the agreed upon time, follow these instruction (Figure 2.1):
- Send a text to InReach units, call and text cell phones of field crew members. See how to send a satellite message to an iphone.
- If no response please call accommodations, then personal emergency contacts to see if they have heard anything.
- Wait 1 hour - repeat steps 1 and 2 again.
- Wait another hour - repeat steps 1 and 2 again.
- After 2 hours - if no response then notify the RCMP of a missing persons in field.
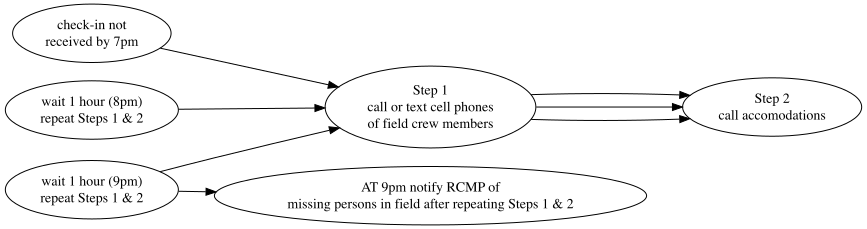
Figure 2.1: Procedures for Failed Check-In
2.1.3 iPhone Satellite Messaging as a Backup Communication Tool
While InReach and Zoleo devices are our primary tools for field communication when we don’t have cell service, iPhone Satellite Messaging offers a backup option in case those devices fail or aren’t accessible.
What You Need:
- An iPhone 14 or later
- iOS 18 installed on your device
- Emergency SOS via satellite is free for two years after the activation of an iPhone 14 or later (all models).
Why It’s Important:
- It allows you to text emergency services.
- You can message friends and team members.
- It’s a backup option if your primary devices aren’t working.
Action Items:
- How to Connect to a Satellite: Follow this guide to get started.
- Set Up Emergency Contacts: Follow this link to set up emergency contacts in the Health app. Before heading out into the field, we should add crew members and Tara as emergency contacts. When you set up emergency contacts, you can choose to notify and share information with them when you text emergency services via satellite.
- Learn How to Send Messages: Check out this link for instructions on sending messages via satellite.
All team members with suitable devices should have this feature set up on their devices before heading into the field.
2.2 Close-calls / incident reporting requirements and procedures
Incidents are situations in the workplace that resulted in or could have resulted in injuries, illnesses, or fatalities. Close calls are incidents that almost happened. These can be used to prevent incidents in the future. We have policies in place so that we can document and review close calls. Reviewing close calls and incidents can help us identify hazards earlier so that we can catch them before they happen. This review process can help us improve our safety procedures such as updating our tailboards. Reporting templates are attached as Appendix 3. A summary of how to fill out an incident/close call report is seen below:
- Record the date of the incident and the names of all personnel involved
- Give a detailed description of the events that transpired leading up to and including the incident. What happened and how did it happen? Was first aid required?
- Describe the immediate and root cause of the incident. Were safety procedures not followed? Were the presence of hazards not communicated properly beforehand? Was the employee/contractor involved in the incident not wearing the proper safety equipment?
- Describe the corrective action(s) to be undertaken. This can depend on the situation. Do your best to ensure that an incident like this will never happen again. Update safety procedures, ensure everyone is wearing the proper safety equipment, communicate to people new to the job that you have the right to refuse unsafe work, etc.
- Sign and date the incident/close call report.
Examples of past incident/close calls include:
- Contractor slipping and falling into a deep beaver pond, the person was wearing waders but no wading belt. No serious injury occured.
- While backing up on the highway, an employee drove too close to the ditch and almost flipped over. This was a close call.
- While tagging fish with a needle and pit tags, an employee stabbed their finger with the needle. There was some bleeding but first aid was administered right away.
2.3 Emergency Response Plan (ERP) and Procedures
Our Emergency Response Plan can be located and downloaded here: Emergency Response Plan.
2.3.1 Remote Site Emergency Call-In Procedures
Remote Site Emergency Call-In Procedures:
- Dial RCMP
- Name:
- Location: (GPS, UTM Co-ordinates, Road Km)
- Phone #
- Nature Of Injury: (severity, what happened, and # of Victims)
- Environmental Conditions: (weather, slope, access conditions)
- Request what you are going to need: (SAR, PEP, Helicopter,)
2.3.2 Fire Safety
Wildfires are becoming increasingly common in British Columbia. It’s important to know how to prevent wildfires and to have a plan in place in case a fire breaks out.
Before heading out to the field:
- Review the current fire danger rating for the area.
- Review the BC Wildfire Dashboard to be aware of any current wildfires in the area. If there are active wildfires in the area, discuss as a group if it is safe to proceed with fieldwork.
- Review the Wildfire Response Plan below.
- Review and complete the Emergency Response Plan which can be found in Appendix 6. Ensure all crew members are familiar with the plan and their roles.
While in the field:
- Regularly monitor the fire danger rating using representative weather stations as well as the BC Wildfire Dashboard.
- Never use open flames or create sparks as part of field tasks when the fire danger rating is “high” or “extreme” in the fieldwork or surrounding area.
- Keep vehicles on roads or other non-vegetated areas to prevent ignition of wildfires by catalytic converters.
2.3.2.1 Wildfire Response Plan
- Stop operations.
- Crew lead notifies all crew members and crews regroup if separated.
- Crew members assume roles as per the Emergency Response Plan.
- Call Forest Fire Reporting: 1-800-663-5555 or * 5555 on the Cantel and Telus networks
- Small fire, can be suppressed by crews:
- Crews suppress fire to their level of safety and competence (water, fire extinguishers, or hand tools). Never attempt to suppress an uncontrolled wildfire.
- The crew member in charge of fire suppression operations should continue to supervise the efforts until relieved by licensee/contractor representative or BC Wildfire Management Branch personnel.
- If crews suppress fire for x amount of time and the fire has not been suppressed then the crew lead should activate the emergency evacuation plan as per the tailboard.
- Large fire, must evacuate:
- Crew members follow Emergency Response Plan and evacuate using the discussed evacuation route.
- Crew lead accounts for all crew members before evacuating the site.
- Crews meet at assembly location.
2.3.3 Landslide, Avalanche, and Natural Disaster Response
- Ensure all workers are trained and understand response procedures and this emergency response plan is available on site at all times.
- Notify supervisor and other workers. If safe to do so, assess situation to determine if activities must be shutdown.
- Take steps to control further environmental impacts.
- Supervisors must account for all workers before leaving the site. If a shutdown is required, park all equipment in an environmentally safe location (avoid riparian management areas, steep side slopes, steep road sections, areas with excessive soil moisture, and areas within reach of standing timber).
- Contact appropriate parties if significant environmental damage or damage to infrastructure requiring repair has occurred (MFLNRO, BCTS, MoTI, etc.).
2.3.4 Spill Response
Step 1. Ensure Safety
- Assess site hazards to ensure safe work procedures.
- Notify Site Supervisor and Environmental Monitor (EM).
- If unsure of the product, consult the MSDS sheets.
- Eliminate ignition sources if spilled material is flammable.
- Wear proper personal protective equipment (gloves) contained in the spill kit.
Step 2. Contain the spill
- Eliminate the source of the spill.
- Use contents of the provided spill kit(s) to stop the spread of the spill/leak. Absorbent socks can be used to surround the spill.
- Remember: White = Fuels & Oils Only, Gray = Universal (Fuels, Oils and Chemicals such as antifreeze)
- Divert spill away from ditches and watercourses.
- Once the spill is contained, attempt to soak it up using an absorbent pads.
- Place the absorbent pads and any contaminated soil in a container and dispose of it in accordance with the MSDS sheet and provincial regulations.
Step 3. Reporting Requirements
- All spills must be reported to the Site Supervisor and the EM. If the EM cannot be reached, notify the Provincial Emergency Program (PEP) at 1-800-663-3456 if the spill meets the thresholds detailed in the Spill Reporting Regulation of BC. A summary of the reporting thresholds for the most likely spilled materials is below.
Spill Reporting Thresholds Oil Fuel, Oil & Hydraulic fluid: Any quantity that enters or is likely to enter water >100L to land Antifreeze: Any quantity that enters or is likely to enter water >25L to land
2.3.5 Injury
Minor wounds, breaks, strains:
Ensure site is safe, stabilize patient (provide first-aid), transport to closest Hospital, if necessary.
Advise office and hospital when you are on route
If accident is the result of a motor vehicle accident, please advise the RCMP at 250 353 2225
Serious injury:
Ensure site is safe, then stabilize (provide first-aid) and/or prepare patient for transport.
Activate SPOT messenger, or call 1 800 461 9911 (if using the satellite phone).
Provide nature of injuries, location co-ordinates in UTM or longitude and latitude for landing site, and communication method to use on the way to the accident site.
If air evacuation is required, you must advise the communication centre you’ve reached; if road evacuation is used, then advise if you will be meeting the ambulance en route.
2.4 Site and Worker Assessments
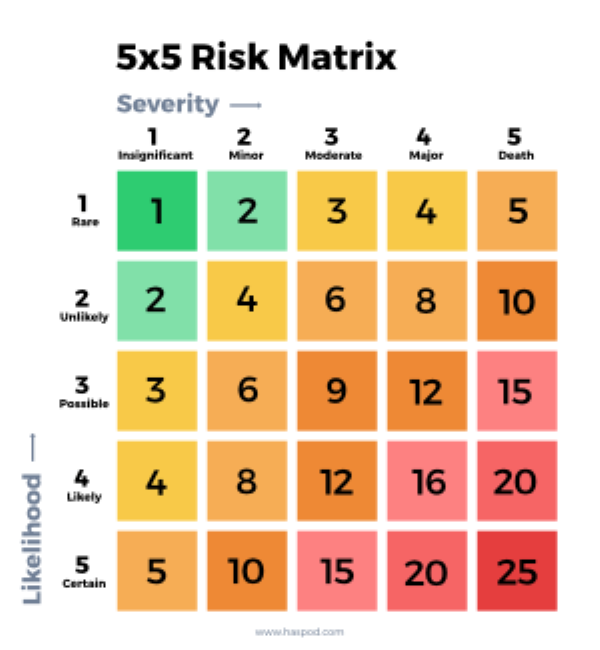
Conducting a systematic risk assessment will help identify the hazards that exist in the workplace, and how they may put workers at risk. To determine if we’ve done enough to protect our workers, we use a rating system as part of our risk assessment. Risk is calculated by multiplying the likelihood by the severity.
Examples of risks/hazards found in and around job sites include, but are not limited to:
- Wildlife
- Swiftwater
- Vehicle traffic
- Slippery/uneven ground
- Exposure to heat or cold
- Machinery
- ATV (roll over, burns, collision)
- Chemicals
- Chainsaw/loppers/knives
- Electrofisher shocks
- Open water
- Overhead snags and sharp branches
2.5 Contractor Selection Policy
At New Graph we are responsible to ensure that the contractors we hire to complete and assist on projects are compliant with the workers compensation act and have a record that illustrates they have a culture of safety. For forestry related work, contractors are required to be part of Safe Certified companies. We have a checklist that we require our contractors to complete to ensure that they meet our requirements. Our policy is to always get a clearance letter before and after we receive services from a contractor to confirm whether they registered with worksafe BC and are paying premiums. The contractor selection and safety checklist forms are included as Appendix 4.
Of note, contractors are considered our workers if they do not operate as an independent business and are either not eligible for WorkSafeBC coverage or decline to purchase WorkSafeBC’s optional coverage. Below are examples of situations where a contractor would likely be our worker:
The contractor supplies only labour
The contractor supplies labour and minor materials
The contractor supplies labour and a piece of major equipment but is not registered with WorkSafeBC
2.6 Personal Protective Equipment (PPE) policy
All employees will be provided the required PPE when they are hired, and instructed on its proper use and care. Employees are responsible for keeping PPE in good working condition and notifying their supervisor if any PPE no longer meets safe standards.
All PPE must meet regulatory and Canadian Standards Association standards.
The following provides a guideline to the requirements and use of PPE. A full listing of requirements can be found in the Occupational Health and Safety Regulation at https://www.worksafebc.com/en/law-policy/occupational-health-safety/searchable-ohs-regulation/ohs-regulation/part-08-personal-protective-clothing-and-equipment
| PPE | Requirements | Used in these situations |
|---|---|---|
| High visibility clothing (vest) |
|
|
| Limb and body protection |
|
|
| Warm dry clothing |
|
|
| Wading Belt |
|
|
| Wading Boots |
|
|
| Polarized glasses |
|
|
| Throw bag and releasable safety rope |
|
|
| Personal Flotation Device |
|
|
| Hard hats |
|
|
| Helmets |
|
|
| Eye and face protection |
|
|
| Safety footwear |
|
|
| Hearing protection |
|
|
| Bear Spray / Bangers |
|
|
2.8 Records of Training
A training log of all employee training/certifications can be found in the data folder here.
2.9 Progressive discipline policy
Actions and behaviors that create or facilitate unsafe working environments and elevate the risk of injury to company representatives, contractors and the public are unacceptable. To ensure that these actions and behaviors do not persist once identified, the following progressive discipline policy has been implemented.
Verbal Warning
Documented Warning
Letter of Reprimand
Discharge